> ## Documentation Index
> Fetch the complete documentation index at: https://docs.kasoftware.com/llms.txt
> Use this file to discover all available pages before exploring further.

# 工作區

> 管理知行之橋工作區以隔離工作流程、控制使用者存取權限並組織端口。

export const siteNameShort = "知行之橋";

**工作區**能夠隔離工作流程畫布。在單獨的工作區中配置的端口和工作流程會儲存在磁碟上完全獨立的資料夾中，從而允許出於組織目的完全分離流程。

一次僅顯示一個工作區的端口，因此使用多個工作區有助於減少 **工作流程** 頁面上的混亂。例如，單個工作流程畫布可以包含 Amazon、Target 和 Walmart 的自動交易流程，但這些獨立的工作流程也可以分隔到新的工作區中，如下圖所示：

<img src="https://mintcdn.com/qiao/U-KEZ9JbQY4Wqs1D/public/images/Workspaces.png?fit=max&auto=format&n=U-KEZ9JbQY4Wqs1D&q=85&s=e68fb83ae16741cc58907577efe1cfa3" alt="Three workspace cards for Amazon, Target, and Walmart" width="300" data-path="public/images/Workspaces.png" />

使用工作區來劃分工作流程還提供了一種輕鬆控制使用者權限及其對這些工作流程存取權限的方法。以上圖為例，分配給 Jenny 的使用者帳戶可能對 Amazon 工作區具有完全存取權限，對 Target 工作區具有更有限的存取權限，而對 Walmart 工作區完全沒有存取權限。有關權限的更多資訊，請參閱[使用者角色](../getting-started/administration/settings/user-roles)。

一個工作區中的端口無法連線到另一工作區中的端口。

[日誌頁面](../getting-started/administration/activity)會收集並顯示所有工作區的資料。可以在 **訊息** 和 **交易記錄** 索引標籤上按工作區名稱進行過濾，但對於應用程式監視和管理，工作區在功能上被視為相同。

## 使用工作區清單

單擊 **工作流程** 索引標籤時，將看到工作區清單。在這裡，可以對單個工作區執行操作，或使用[工作區卡](#工作區卡)上的核取方塊選擇多個工作區來執行批次操作。頁面頂部的工具列允許執行以下操作：

<table>
  <colgroup>
    <col style={{ width: "65px" }} />

    <col />
  </colgroup>

  <thead>
    <tr><th>圖示</th><th>操作</th></tr>
  </thead>

  <tbody>
    <tr>
      <td style={{ verticalAlign: "middle", padding: "0.25rem 0.75rem" }}>
        <img src="https://mintcdn.com/qiao/ilnLy7gsSdFqbKmI/public/images/workspace_grid_refresh.png?fit=max&auto=format&n=ilnLy7gsSdFqbKmI&q=85&s=a5e236624a3121e576fb68dec3654632" alt="Refresh icon" noZoom style={{ display: "block", height: "24px" }} width="26" height="25" data-path="public/images/workspace_grid_refresh.png" />
      </td>

      <td style={{ verticalAlign: "middle", padding: "0.25rem 0.75rem" }}>重新整理選定的工作區（如果未選擇任何工作區，則重新整理所有工作區）。</td>
    </tr>

    <tr>
      <td style={{ verticalAlign: "middle", padding: "0.25rem 0.75rem" }}>
        <img src="https://mintcdn.com/qiao/ilnLy7gsSdFqbKmI/public/images/workspace_grid_export.png?fit=max&auto=format&n=ilnLy7gsSdFqbKmI&q=85&s=ed663fab6278ad7a4cdb8d91d6ddaeba" alt="Export icon" noZoom style={{ display: "block", height: "24px" }} width="24" height="25" data-path="public/images/workspace_grid_export.png" />
      </td>

      <td style={{ verticalAlign: "middle", padding: "0.25rem 0.75rem" }}>將選定的工作區匯出到 <code>.arc</code> 檔案中（僅當至少選擇一個工作區卡時可用）。</td>
    </tr>

    <tr>
      <td style={{ verticalAlign: "middle", padding: "0.25rem 0.75rem" }}>
        <img src="https://mintcdn.com/qiao/ilnLy7gsSdFqbKmI/public/images/workspace_grid_delete.png?fit=max&auto=format&n=ilnLy7gsSdFqbKmI&q=85&s=14bdc4ea1afee0a6156d8de2589ca7d3" alt="Delete icon" noZoom style={{ display: "block", height: "24px" }} width="68" height="34" data-path="public/images/workspace_grid_delete.png" />
      </td>

      <td style={{ verticalAlign: "middle", padding: "0.25rem 0.75rem" }}>刪除選定的工作區（僅當至少選擇一個工作區卡時可用）。</td>
    </tr>

    <tr>
      <td style={{ verticalAlign: "middle", padding: "0.25rem 0.75rem" }}>
        <img src="https://mintcdn.com/qiao/ilnLy7gsSdFqbKmI/public/images/workspace_grid_import.png?fit=max&auto=format&n=ilnLy7gsSdFqbKmI&q=85&s=a8ee079c9184bf7a2d7a57bc935a9e66" alt="Import icon" noZoom style={{ display: "block", height: "24px" }} width="70" height="34" data-path="public/images/workspace_grid_import.png" />
      </td>

      <td style={{ verticalAlign: "middle", padding: "0.25rem 0.75rem" }}>將 <code>.arcflow</code> 檔案匯入到選定的工作區。</td>
    </tr>
  </tbody>
</table>

還可以透過單擊 **新增工作區** 來手動建立新工作區。

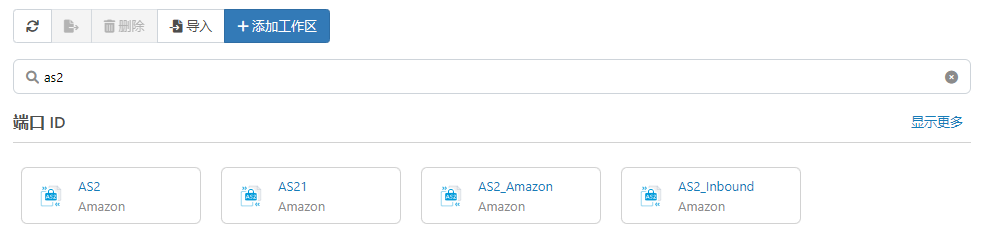
透過搜尋欄，可以搜尋特定工作區、[端口](../connectors)、端口型別或[工作流程 API](./flow-api)。

<img src="https://mintcdn.com/qiao/ilnLy7gsSdFqbKmI/public/images/workspace_searchresults.png?fit=max&auto=format&n=ilnLy7gsSdFqbKmI&q=85&s=379d94e6cc739fe2edda86652e746569" alt="Workspace search results" width="800" data-path="public/images/workspace_searchresults.png" />

單擊結果會將你帶到其工作區卡中的該物件。

可以按以下條件過濾工作區卡：

* 按字母順序
* 最後修改日期
* 最後存取日期

## 工作區卡

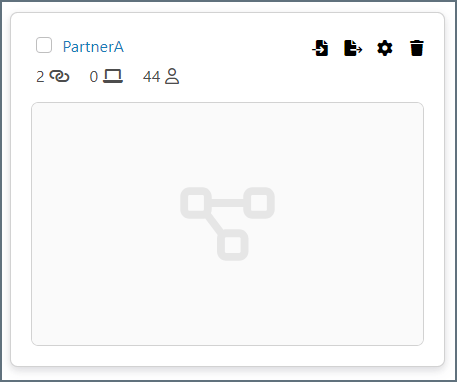
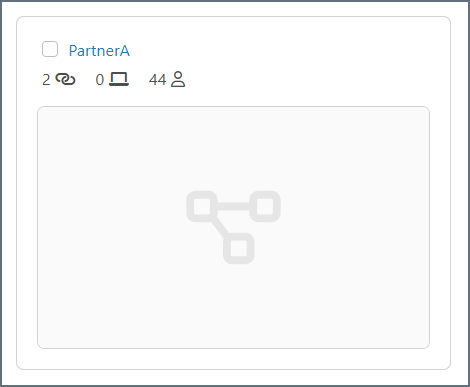
每個工作區卡都是一個快照檢視，顯示工作區名稱以及該工作區中端口、工作流程 API 和有存取權限的使用者數量。
<img src="https://mintcdn.com/qiao/ilnLy7gsSdFqbKmI/public/images/workspace_card.png?fit=max&auto=format&n=ilnLy7gsSdFqbKmI&q=85&s=4386b6ad7c89c3f2db73f84a77041877" alt="Workspace card" width="450" data-path="public/images/workspace_card.png" />

<table>
  <colgroup>
    <col style={{ width: "65px" }} />

    <col />
  </colgroup>

  <thead>
    <tr><th>圖示</th><th>說明</th></tr>
  </thead>

  <tbody>
    <tr>
      <td style={{ verticalAlign: "middle", padding: "0.25rem 0.75rem" }}>
        <img src="https://mintcdn.com/qiao/ilnLy7gsSdFqbKmI/public/images/workspace_card_chain_icon.png?fit=max&auto=format&n=ilnLy7gsSdFqbKmI&q=85&s=e1c47841f48faa2b843cf8b527cca44b" alt="Chain icon" noZoom style={{ display: "block", height: "24px" }} width="21" height="18" data-path="public/images/workspace_card_chain_icon.png" />
      </td>

      <td style={{ verticalAlign: "middle", padding: "0.25rem 0.75rem" }}>將滑鼠懸停在此圖示上可檢視工作區中的端口清單。</td>
    </tr>

    <tr>
      <td style={{ verticalAlign: "middle", padding: "0.25rem 0.75rem" }}>
        <img src="https://mintcdn.com/qiao/ilnLy7gsSdFqbKmI/public/images/workspace_card_screen_icon.png?fit=max&auto=format&n=ilnLy7gsSdFqbKmI&q=85&s=9d9ab4c30889a7c878de2443a73427b7" alt="Screen icon" noZoom style={{ display: "block", height: "24px" }} width="21" height="18" data-path="public/images/workspace_card_screen_icon.png" />
      </td>

      <td style={{ verticalAlign: "middle", padding: "0.25rem 0.75rem" }}>將滑鼠懸停在此圖示上可檢視工作區中所有工作流程 API 的清單以及正在使用的 HTTP 方法。</td>
    </tr>

    <tr>
      <td style={{ verticalAlign: "middle", padding: "0.25rem 0.75rem" }}>
        <img src="https://mintcdn.com/qiao/ilnLy7gsSdFqbKmI/public/images/workspace_card_user_icon.png?fit=max&auto=format&n=ilnLy7gsSdFqbKmI&q=85&s=fd88f77f1d0ce76f83c25c8ff8733919" alt="User icon" noZoom style={{ display: "block", height: "24px" }} width="21" height="24" data-path="public/images/workspace_card_user_icon.png" />
      </td>

      <td style={{ verticalAlign: "middle", padding: "0.25rem 0.75rem" }}>將滑鼠懸停在此圖示上可檢視對工作區具有權限的使用者清單。</td>
    </tr>
  </tbody>
</table>

將滑鼠懸停在卡片上時，會出現一組附加圖示。

<img src="https://mintcdn.com/qiao/ilnLy7gsSdFqbKmI/public/images/workspace_card_icons.png?fit=max&auto=format&n=ilnLy7gsSdFqbKmI&q=85&s=da868b7220d302a31bb9c9467065e1c0" alt="Workspace card hover icons" width="450" data-path="public/images/workspace_card_icons.png" />

<table>
  <colgroup>
    <col style={{ width: "65px" }} />

    <col />
  </colgroup>

  <thead>
    <tr><th>圖示</th><th>操作</th></tr>
  </thead>

  <tbody>
    <tr>
      <td style={{ verticalAlign: "middle", padding: "0.25rem 0.75rem" }}>
        <img src="https://mintcdn.com/qiao/ilnLy7gsSdFqbKmI/public/images/workspace_card_import_icon.png?fit=max&auto=format&n=ilnLy7gsSdFqbKmI&q=85&s=66bce8c33627767dc981ffc4c586d7c8" alt="Import icon" noZoom style={{ display: "block", height: "24px" }} width="26" height="25" data-path="public/images/workspace_card_import_icon.png" />
      </td>

      <td style={{ verticalAlign: "middle", padding: "0.25rem 0.75rem" }}>
        開啟 <strong>工作區匯入</strong> 對話方塊。導航到要匯入的 <code>.arcflow</code> 檔案並選擇 <strong>開啟</strong>。單擊 <strong>下一步</strong> 設定工作區匯入選項，然後再次單擊 <strong>下一步</strong> 檢查衝突並完成匯入。有關詳細資訊，請參閱<a href="../getting-started/administration/importing-exporting-flows#setting-import-options">設定匯入選項</a>和<a href="../getting-started/administration/importing-exporting-flows#resolving-import-conflicts">解決匯入衝突</a>。
        <Tip>要匯入全域 <code>.arc</code> 檔案，請使用<a href="../getting-started/administration/settings/settings-page">設定</a> > <strong>移轉</strong>。有關詳細資訊，請參閱<a href="../getting-started/administration/importing-exporting-flows#importing-multiple-workspaces-and-global-application-data">匯入多個工作區和全域應用程式資料</a>。</Tip>
      </td>
    </tr>

    <tr>
      <td style={{ verticalAlign: "middle", padding: "0.25rem 0.75rem" }}>
        <img src="https://mintcdn.com/qiao/ilnLy7gsSdFqbKmI/public/images/workspace_card_export_icon.png?fit=max&auto=format&n=ilnLy7gsSdFqbKmI&q=85&s=ddf0c032cb39fd988aabb520f4e29947" alt="Export icon" noZoom style={{ display: "block", height: "24px" }} width="27" height="25" data-path="public/images/workspace_card_export_icon.png" />
      </td>

      <td style={{ verticalAlign: "middle", padding: "0.25rem 0.75rem" }}>開啟 <strong>工作區匯出</strong> 對話方塊，該對話方塊允許匯出包含工作區內容的 <code>.arcflow</code> 檔案。有關詳細資訊，請參閱<a href="../getting-started/administration/importing-exporting-flows#exporting-a-workspace">匯出工作區</a>。</td>
    </tr>

    <tr>
      <td style={{ verticalAlign: "middle", padding: "0.25rem 0.75rem" }}>
        <img src="https://mintcdn.com/qiao/ilnLy7gsSdFqbKmI/public/images/workspace_card_gear_icon.png?fit=max&auto=format&n=ilnLy7gsSdFqbKmI&q=85&s=a2fab61d54a7633306d773f88aa5c48d" alt="Gear icon" noZoom style={{ display: "block", height: "24px" }} width="26" height="25" data-path="public/images/workspace_card_gear_icon.png" />
      </td>

      <td style={{ verticalAlign: "middle", padding: "0.25rem 0.75rem" }}>開啟 <strong>工作區設定</strong> 對話方塊。</td>
    </tr>

    <tr>
      <td style={{ verticalAlign: "middle", padding: "0.25rem 0.75rem" }}>
        <img src="https://mintcdn.com/qiao/ilnLy7gsSdFqbKmI/public/images/workspace_card_delete_icon.png?fit=max&auto=format&n=ilnLy7gsSdFqbKmI&q=85&s=1a555b3fe7559a2521a177cefbd4651a" alt="Delete icon" noZoom style={{ display: "block", height: "24px" }} width="26" height="25" data-path="public/images/workspace_card_delete_icon.png" />
      </td>

      <td style={{ verticalAlign: "middle", padding: "0.25rem 0.75rem" }}>刪除當前工作區。</td>
    </tr>
  </tbody>
</table>

## 預設工作區

{siteNameShort} 包含一個無法刪除的特殊 *Default* 工作區。你不需要使用多個工作區，因為可以在預設工作區中配置所有工作流程。

預設工作區將所有應用程式資料檔案和配置檔案儲存在應用程式目錄中的 `data` 資料夾中。任何其他工作區的資料和配置檔案都儲存在應用程式目錄中的 `workspaces` 資料夾中。

## 從工作流程畫布導航和管理工作區

從工作區清單中，單擊進入一個工作區。

可以使用工作流程畫布的頂部工具列來管理工作區：

<img src="https://mintcdn.com/qiao/bVtjD3fvHFZBo1vE/public/images/flows_canvas_workspace_options.png?fit=max&auto=format&n=bVtjD3fvHFZBo1vE&q=85&s=4d517479daaa24b581b7f0a861146067" alt="Flow canvas workspace toolbar options" width="800" data-path="public/images/flows_canvas_workspace_options.png" />

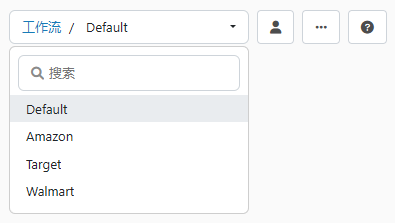
* 使用左側的工作區選擇器下拉功能表切換到不同的工作區。
* <img src="https://mintcdn.com/qiao/bVtjD3fvHFZBo1vE/public/images/flows_view_users.png?fit=max&auto=format&n=bVtjD3fvHFZBo1vE&q=85&s=5ec79ad42601a0bed11fafba8289c9e1" alt="View users icon" noZoom style={{ display: "inline-block", verticalAlign: "middle", height: "1.6em", margin: 0 }} width="23" height="23" data-path="public/images/flows_view_users.png" /> 檢視哪些使用者可以存取此工作區，或新增新使用者。此選項僅對 {siteNameShort} 管理員使用者可見。
* 單擊省略號以取得其他選項，然後進行選擇：
  * 選擇 **匯入工作區** 從另一個 {siteNameShort} 例項匯入工作區。導航到要匯入的 `.arcflow` 檔案並選擇 **開啟**。單擊 **下一步** 設定工作區匯入選項，然後再次單擊 **下一步** 檢查衝突並完成匯入。有關詳細資訊，請參閱[設定匯入選項](../getting-started/administration/importing-exporting-flows#setting-import-options)和[解決匯入衝突](../getting-started/administration/importing-exporting-flows#resolving-import-conflicts)。
  * 選擇 **匯出工作區** 以匯出可匯入到另一個 {siteNameShort} 例項中的工作區。設定匯出首選項，然後單擊 **匯出** 以建立 `.arcflow` 檔案。有關詳細資訊，請參閱[設定匯出選項](../getting-started/administration/importing-exporting-flows#setting-export-options)。
  * 單擊 **設定** 開啟工作區特定的[設定](#工作區設定)對話方塊。
* <img src="https://mintcdn.com/qiao/bVtjD3fvHFZBo1vE/public/images/flows_help.png?fit=max&auto=format&n=bVtjD3fvHFZBo1vE&q=85&s=490f5952c51d28ed61fd6c671c18184e" alt="Help icon" noZoom style={{ display: "inline-block", verticalAlign: "middle", height: "1.6em", margin: 0 }} width="29" height="27" data-path="public/images/flows_help.png" /> 單擊 **幫助** 按鈕可在新的瀏覽器索引標籤中開啟工作流程設計器的文件。
* 使用搜尋欄搜尋當前工作區中的端口、[工作流程 API](./flow-api)、已儲存檢視和[註解](./designing-a-flow#using-notes)。找到搜尋內容後，單擊它即可轉到畫布中的物件。
* <img src="https://mintcdn.com/qiao/bVtjD3fvHFZBo1vE/public/images/flows_cursor_select.png?fit=max&auto=format&n=bVtjD3fvHFZBo1vE&q=85&s=5414b9dc8e30af339196d7cb323ea2ba" alt="Cursor select toggle" noZoom style={{ display: "inline-block", verticalAlign: "middle", height: "1.6em", margin: 0 }} width="49" height="27" data-path="public/images/flows_cursor_select.png" /> 使用切換按鈕設定游標執行的操作。選項包括：
  * **移動**：允許使用者在畫布上單擊並拖動，以在畫布內導航。這是預設操作。
  * **多選**：允許使用者在一組端口周圍繪製矩形。建立工作流程 API 或需要一次移動或刪除多個端口時，此功能非常有用。右鍵單擊矩形可檢視可對矩形中所有物件執行的操作。
* <img src="https://mintcdn.com/qiao/bVtjD3fvHFZBo1vE/public/images/flows_undo.png?fit=max&auto=format&n=bVtjD3fvHFZBo1vE&q=85&s=331099290c05632e25340ca096b694c6" alt="Undo icon" noZoom style={{ display: "inline-block", verticalAlign: "middle", height: "1.6em", margin: 0 }} width="28" height="27" data-path="public/images/flows_undo.png" /> 撤消最近的操作。
* <img src="https://mintcdn.com/qiao/bVtjD3fvHFZBo1vE/public/images/flows_redo.png?fit=max&auto=format&n=bVtjD3fvHFZBo1vE&q=85&s=3b58244ee41f370bbfce5ab9678c23a3" alt="Redo icon" noZoom style={{ display: "inline-block", verticalAlign: "middle", height: "1.6em", margin: 0 }} width="28" height="27" data-path="public/images/flows_redo.png" /> 在畫布上恢復之前撤消的佈局。
* <img src="https://mintcdn.com/qiao/bVtjD3fvHFZBo1vE/public/images/flows_save_view.png?fit=max&auto=format&n=bVtjD3fvHFZBo1vE&q=85&s=bb1c899b442dde634da7558b0e015359" alt="Save view icon" noZoom style={{ display: "inline-block", verticalAlign: "middle", height: "1.6em", margin: 0 }} width="29" height="27" data-path="public/images/flows_save_view.png" /> 儲存當前工作區檢視。
* <img src="https://mintcdn.com/qiao/bVtjD3fvHFZBo1vE/public/images/flows_autoformat.png?fit=max&auto=format&n=bVtjD3fvHFZBo1vE&q=85&s=cafe05ed4eb3eb7ae56d4462d4acb62b" alt="Auto-format icon" noZoom style={{ display: "inline-block", verticalAlign: "middle", height: "1.6em", margin: 0 }} width="26" height="23" data-path="public/images/flows_autoformat.png" /> 自動格式化並佈局整個工作流程畫布。如果在工作區中選擇了多個端口，請使用此功能僅自動格式化選定的端口。

<Tip>
  單擊 **工作流程** 麵包屑連結可傳回工作區清單。

  工作流程畫布右下角的小地圖顯示工作區中端口的輪廓。畫布的當前檢視由地圖中的白色矩形表示。在畫布上移動時，白色矩形也會移動，因此你始終可以大致瞭解自己在工作區中的位置。
</Tip>

## 工作區設定

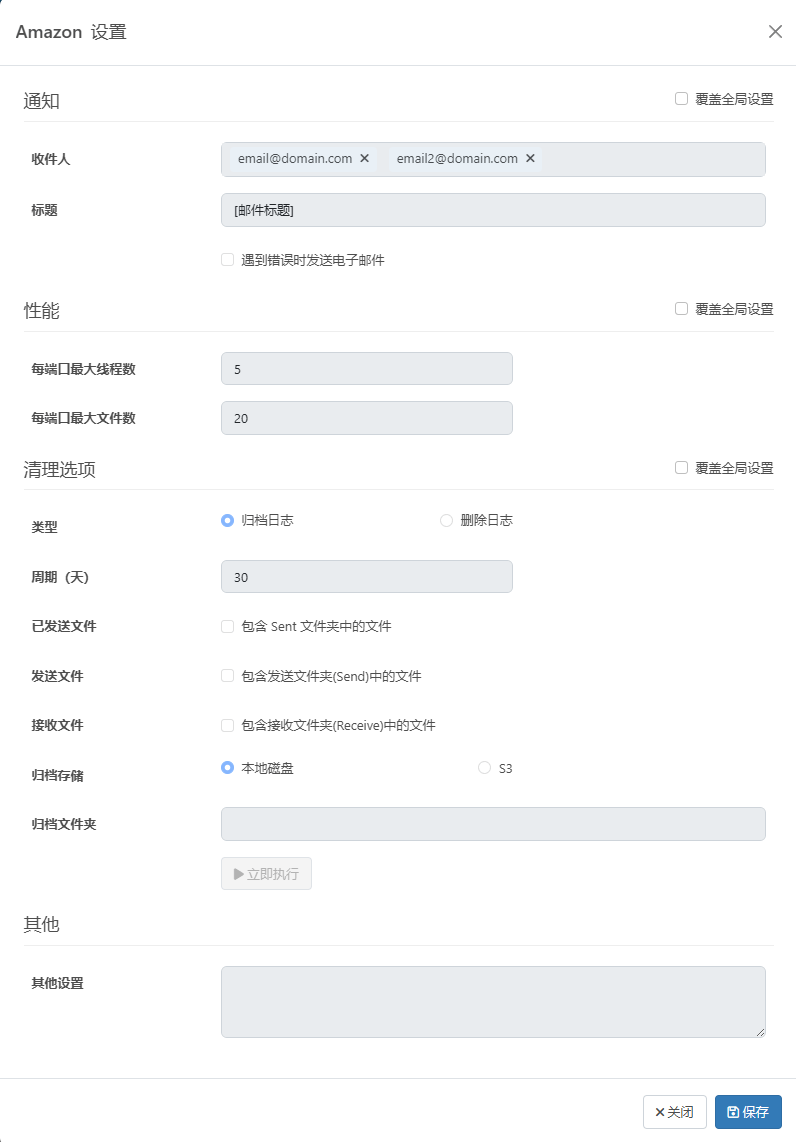
“工作區設定”對話方塊能夠按工作區控制特定設定和方面。對於每個設定類別，必須單擊 **覆蓋全域設定** 核取方塊才能使工作區特定的設定生效。這些設定是[設定頁面](../getting-started/administration/settings/settings-page)上選項的子集。可以配置：

* [提醒](../getting-started/administration/settings/alerts)
* [效能設定](../getting-started/administration/settings/performance-settings)
* [清理設定](../getting-started/administration/settings/cleanup-settings)
* 其他設定：使你能夠在以分號分隔的清單中配置隱藏的端口設定（例如，`setting1=value1;setting2=value2`）。正常的端口用例和功能不應要求使用這些設定。

  <img src="https://mintcdn.com/qiao/ilnLy7gsSdFqbKmI/public/images/workspace_settings.png?fit=max&auto=format&n=ilnLy7gsSdFqbKmI&q=85&s=b6c5c64bbb56defa5b3e49dc3abe33d4" alt="Workspace settings dialog" width="600" data-path="public/images/workspace_settings.png" />