> ## Documentation Index
> Fetch the complete documentation index at: https://docs.kasoftware.com/llms.txt
> Use this file to discover all available pages before exploring further.

# 工作区

> 管理知行之桥工作区以隔离工作流、控制用户访问权限并组织端口。

export const siteNameShort = "知行之桥";

**工作区**能够隔离工作流画布。在单独的工作区中配置的端口和工作流会保存在磁盘上完全独立的文件夹中，从而允许出于组织目的完全分离流程。

一次仅显示一个工作区的端口，因此使用多个工作区有助于减少 **工作流** 页面上的混乱。例如，单个工作流画布可以包含 Amazon、Target 和 Walmart 的自动交易流程，但这些独立的工作流也可以分隔到新的工作区中，如下图所示：

<img src="https://mintcdn.com/qiao/U-KEZ9JbQY4Wqs1D/public/images/Workspaces.png?fit=max&auto=format&n=U-KEZ9JbQY4Wqs1D&q=85&s=e68fb83ae16741cc58907577efe1cfa3" alt="Three workspace cards for Amazon, Target, and Walmart" width="300" data-path="public/images/Workspaces.png" />

使用工作区来划分工作流还提供了一种轻松控制用户权限及其对这些工作流访问权限的方法。以上图为例，分配给 Jenny 的用户帐户可能对 Amazon 工作区具有完全访问权限，对 Target 工作区具有更有限的访问权限，而对 Walmart 工作区完全没有访问权限。有关权限的更多信息，请参阅[用户管理和角色](/26.2/self-hosted/zh/getting-started/administration/settings/user-roles)。

一个工作区中的端口无法连接到另一工作区中的端口。

[日志页面](/26.2/self-hosted/zh/getting-started/administration/activity)会收集并显示所有工作区的数据。可以在 **消息** 和 **交易记录** 选项卡上按工作区名称进行过滤，但对于应用程序监视和管理，工作区在功能上被视为相同。

## 使用工作区列表

单击 **工作流** 选项卡时，将看到工作区列表。在这里，可以对单个工作区执行操作，或使用[工作区卡](#工作区卡)上的复选框选择多个工作区来执行批量操作。页面顶部的工具栏允许执行以下操作：

<table>
  <colgroup>
    <col style={{ width: "65px" }} />

    <col />
  </colgroup>

  <thead>
    <tr><th>图标</th><th>操作</th></tr>
  </thead>

  <tbody>
    <tr>
      <td style={{ verticalAlign: "middle", padding: "0.25rem 0.75rem" }}>
        <img src="https://mintcdn.com/qiao/ilnLy7gsSdFqbKmI/public/images/workspace_grid_refresh.png?fit=max&auto=format&n=ilnLy7gsSdFqbKmI&q=85&s=a5e236624a3121e576fb68dec3654632" alt="Refresh icon" noZoom style={{ display: "block", height: "24px" }} width="26" height="25" data-path="public/images/workspace_grid_refresh.png" />
      </td>

      <td style={{ verticalAlign: "middle", padding: "0.25rem 0.75rem" }}>刷新选定的工作区（如果未选择任何工作区，则刷新所有工作区）。</td>
    </tr>

    <tr>
      <td style={{ verticalAlign: "middle", padding: "0.25rem 0.75rem" }}>
        <img src="https://mintcdn.com/qiao/ilnLy7gsSdFqbKmI/public/images/workspace_grid_export.png?fit=max&auto=format&n=ilnLy7gsSdFqbKmI&q=85&s=ed663fab6278ad7a4cdb8d91d6ddaeba" alt="Export icon" noZoom style={{ display: "block", height: "24px" }} width="24" height="25" data-path="public/images/workspace_grid_export.png" />
      </td>

      <td style={{ verticalAlign: "middle", padding: "0.25rem 0.75rem" }}>将选定的工作区导出到 <code>.arc</code> 文件中（仅当至少选择一个工作区卡时可用）。</td>
    </tr>

    <tr>
      <td style={{ verticalAlign: "middle", padding: "0.25rem 0.75rem" }}>
        <img src="https://mintcdn.com/qiao/ilnLy7gsSdFqbKmI/public/images/workspace_grid_delete.png?fit=max&auto=format&n=ilnLy7gsSdFqbKmI&q=85&s=14bdc4ea1afee0a6156d8de2589ca7d3" alt="Delete icon" noZoom style={{ display: "block", height: "24px" }} width="68" height="34" data-path="public/images/workspace_grid_delete.png" />
      </td>

      <td style={{ verticalAlign: "middle", padding: "0.25rem 0.75rem" }}>删除选定的工作区（仅当至少选择一个工作区卡时可用）。</td>
    </tr>

    <tr>
      <td style={{ verticalAlign: "middle", padding: "0.25rem 0.75rem" }}>
        <img src="https://mintcdn.com/qiao/ilnLy7gsSdFqbKmI/public/images/workspace_grid_import.png?fit=max&auto=format&n=ilnLy7gsSdFqbKmI&q=85&s=a8ee079c9184bf7a2d7a57bc935a9e66" alt="Import icon" noZoom style={{ display: "block", height: "24px" }} width="70" height="34" data-path="public/images/workspace_grid_import.png" />
      </td>

      <td style={{ verticalAlign: "middle", padding: "0.25rem 0.75rem" }}>将 <code>.arcflow</code> 文件导入到选定的工作区。</td>
    </tr>
  </tbody>
</table>

还可以通过单击 **添加工作区** 来手动创建新工作区。

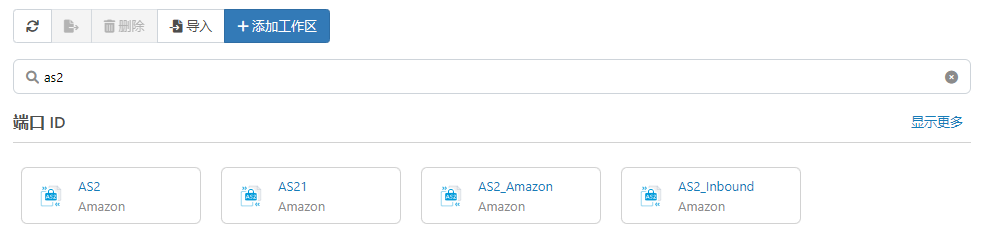
通过搜索栏，可以搜索特定工作区、[端口](/26.2/self-hosted/zh/connectors)、端口类型或[工作流 API](/26.2/self-hosted/zh/flows/flow-api)。

<img src="https://mintcdn.com/qiao/ilnLy7gsSdFqbKmI/public/images/workspace_searchresults.png?fit=max&auto=format&n=ilnLy7gsSdFqbKmI&q=85&s=379d94e6cc739fe2edda86652e746569" alt="Workspace search results" width="800" data-path="public/images/workspace_searchresults.png" />

单击结果会将你带到其工作区卡中的该对象。

可以按以下条件过滤工作区卡：

* 按字母顺序
* 最后修改日期
* 最后访问日期

## 工作区卡

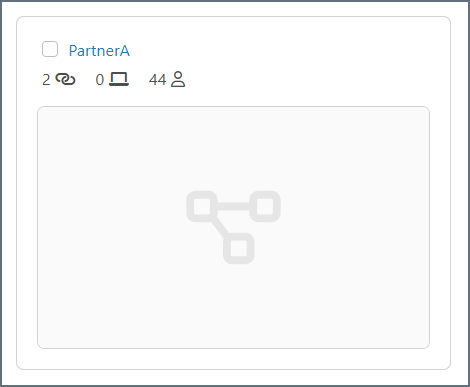
每个工作区卡都是一个快照视图，显示工作区名称以及该工作区中端口、工作流 API 和有访问权限的用户数量。

<img src="https://mintcdn.com/qiao/ilnLy7gsSdFqbKmI/public/images/workspace_card.png?fit=max&auto=format&n=ilnLy7gsSdFqbKmI&q=85&s=4386b6ad7c89c3f2db73f84a77041877" alt="Workspace card" width="450" data-path="public/images/workspace_card.png" />

<table>
  <colgroup>
    <col style={{ width: "65px" }} />

    <col />
  </colgroup>

  <thead>
    <tr><th>图标</th><th>说明</th></tr>
  </thead>

  <tbody>
    <tr>
      <td style={{ verticalAlign: "middle", padding: "0.25rem 0.75rem" }}>
        <img src="https://mintcdn.com/qiao/ilnLy7gsSdFqbKmI/public/images/workspace_card_chain_icon.png?fit=max&auto=format&n=ilnLy7gsSdFqbKmI&q=85&s=e1c47841f48faa2b843cf8b527cca44b" alt="Chain icon" noZoom style={{ display: "block", height: "24px" }} width="21" height="18" data-path="public/images/workspace_card_chain_icon.png" />
      </td>

      <td style={{ verticalAlign: "middle", padding: "0.25rem 0.75rem" }}>将鼠标悬停在此图标上可查看工作区中的端口列表。</td>
    </tr>

    <tr>
      <td style={{ verticalAlign: "middle", padding: "0.25rem 0.75rem" }}>
        <img src="https://mintcdn.com/qiao/ilnLy7gsSdFqbKmI/public/images/workspace_card_screen_icon.png?fit=max&auto=format&n=ilnLy7gsSdFqbKmI&q=85&s=9d9ab4c30889a7c878de2443a73427b7" alt="Screen icon" noZoom style={{ display: "block", height: "24px" }} width="21" height="18" data-path="public/images/workspace_card_screen_icon.png" />
      </td>

      <td style={{ verticalAlign: "middle", padding: "0.25rem 0.75rem" }}>将鼠标悬停在此图标上可查看工作区中所有工作流 API 的列表以及正在使用的 HTTP 方法。</td>
    </tr>

    <tr>
      <td style={{ verticalAlign: "middle", padding: "0.25rem 0.75rem" }}>
        <img src="https://mintcdn.com/qiao/ilnLy7gsSdFqbKmI/public/images/workspace_card_user_icon.png?fit=max&auto=format&n=ilnLy7gsSdFqbKmI&q=85&s=fd88f77f1d0ce76f83c25c8ff8733919" alt="User icon" noZoom style={{ display: "block", height: "24px" }} width="21" height="24" data-path="public/images/workspace_card_user_icon.png" />
      </td>

      <td style={{ verticalAlign: "middle", padding: "0.25rem 0.75rem" }}>将鼠标悬停在此图标上可查看对工作区具有权限的用户列表。</td>
    </tr>
  </tbody>
</table>

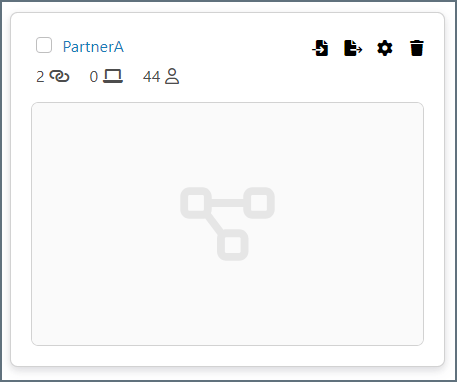
将鼠标悬停在卡片上时，会出现一组附加图标。

<img src="https://mintcdn.com/qiao/ilnLy7gsSdFqbKmI/public/images/workspace_card_icons.png?fit=max&auto=format&n=ilnLy7gsSdFqbKmI&q=85&s=da868b7220d302a31bb9c9467065e1c0" alt="Workspace card hover icons" width="450" data-path="public/images/workspace_card_icons.png" />

<table>
  <colgroup>
    <col style={{ width: "65px" }} />

    <col />
  </colgroup>

  <thead>
    <tr><th>图标</th><th>操作</th></tr>
  </thead>

  <tbody>
    <tr>
      <td style={{ verticalAlign: "middle", padding: "0.25rem 0.75rem" }}>
        <img src="https://mintcdn.com/qiao/ilnLy7gsSdFqbKmI/public/images/workspace_card_import_icon.png?fit=max&auto=format&n=ilnLy7gsSdFqbKmI&q=85&s=66bce8c33627767dc981ffc4c586d7c8" alt="Import icon" noZoom style={{ display: "block", height: "24px" }} width="26" height="25" data-path="public/images/workspace_card_import_icon.png" />
      </td>

      <td style={{ verticalAlign: "middle", padding: "0.25rem 0.75rem" }}>
        打开 <strong>工作区导入</strong> 对话框。导航到要导入的 <code>.arcflow</code> 文件并选择 <strong>打开</strong>。单击 <strong>下一步</strong> 设置工作区导入选项，然后再次单击 <strong>下一步</strong> 检查冲突并完成导入。有关详细信息，请参阅<a href="/26.2/self-hosted/zh/getting-started/administration/importing-exporting-flows#setting-import-options">设置导入选项</a>和<a href="/26.2/self-hosted/zh/getting-started/administration/importing-exporting-flows#resolving-import-conflicts">解决导入冲突</a>。
        <Tip>要导入全局 <code>.arc</code> 文件，请使用<a href="/26.2/self-hosted/zh/getting-started/administration/settings/settings-page">设置</a> > <strong>迁移</strong>。有关详细信息，请参阅<a href="/26.2/self-hosted/zh/getting-started/administration/importing-exporting-flows#importing-multiple-workspaces-and-global-application-data">导入多个工作区和全局应用程序数据</a>。</Tip>
      </td>
    </tr>

    <tr>
      <td style={{ verticalAlign: "middle", padding: "0.25rem 0.75rem" }}>
        <img src="https://mintcdn.com/qiao/ilnLy7gsSdFqbKmI/public/images/workspace_card_export_icon.png?fit=max&auto=format&n=ilnLy7gsSdFqbKmI&q=85&s=ddf0c032cb39fd988aabb520f4e29947" alt="Export icon" noZoom style={{ display: "block", height: "24px" }} width="27" height="25" data-path="public/images/workspace_card_export_icon.png" />
      </td>

      <td style={{ verticalAlign: "middle", padding: "0.25rem 0.75rem" }}>打开 <strong>工作区导出</strong> 对话框，该对话框允许导出包含工作区内容的 <code>.arcflow</code> 文件。有关详细信息，请参阅<a href="/26.2/self-hosted/zh/getting-started/administration/importing-exporting-flows#exporting-a-workspace">导出工作区</a>。</td>
    </tr>

    <tr>
      <td style={{ verticalAlign: "middle", padding: "0.25rem 0.75rem" }}>
        <img src="https://mintcdn.com/qiao/ilnLy7gsSdFqbKmI/public/images/workspace_card_gear_icon.png?fit=max&auto=format&n=ilnLy7gsSdFqbKmI&q=85&s=a2fab61d54a7633306d773f88aa5c48d" alt="Gear icon" noZoom style={{ display: "block", height: "24px" }} width="26" height="25" data-path="public/images/workspace_card_gear_icon.png" />
      </td>

      <td style={{ verticalAlign: "middle", padding: "0.25rem 0.75rem" }}>打开 <strong>工作区设置</strong> 对话框。</td>
    </tr>

    <tr>
      <td style={{ verticalAlign: "middle", padding: "0.25rem 0.75rem" }}>
        <img src="https://mintcdn.com/qiao/ilnLy7gsSdFqbKmI/public/images/workspace_card_delete_icon.png?fit=max&auto=format&n=ilnLy7gsSdFqbKmI&q=85&s=1a555b3fe7559a2521a177cefbd4651a" alt="Delete icon" noZoom style={{ display: "block", height: "24px" }} width="26" height="25" data-path="public/images/workspace_card_delete_icon.png" />
      </td>

      <td style={{ verticalAlign: "middle", padding: "0.25rem 0.75rem" }}>删除当前工作区。</td>
    </tr>
  </tbody>
</table>

## 默认工作区

{siteNameShort} 包含一个无法删除的特殊 *Default* 工作区。你不需要使用多个工作区，因为可以在默认工作区中配置所有工作流。

默认工作区将所有应用程序数据文件和配置文件存储在应用程序目录中的 `data` 文件夹中。任何其他工作区的数据和配置文件都保存在应用程序目录中的 `workspaces` 文件夹中。

## 从工作流画布导航和管理工作区

从工作区列表中，单击进入一个工作区。

可以使用工作流画布的顶部工具栏来管理工作区：

<img src="https://mintcdn.com/qiao/bVtjD3fvHFZBo1vE/public/images/flows_canvas_workspace_options.png?fit=max&auto=format&n=bVtjD3fvHFZBo1vE&q=85&s=4d517479daaa24b581b7f0a861146067" alt="Flow canvas workspace toolbar options" width="800" data-path="public/images/flows_canvas_workspace_options.png" />

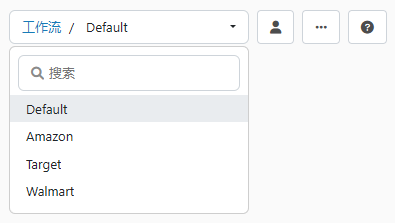
* 使用左侧的工作区选择器下拉菜单切换到不同的工作区。
* <img src="https://mintcdn.com/qiao/bVtjD3fvHFZBo1vE/public/images/flows_view_users.png?fit=max&auto=format&n=bVtjD3fvHFZBo1vE&q=85&s=5ec79ad42601a0bed11fafba8289c9e1" alt="View users icon" noZoom style={{ display: "inline-block", verticalAlign: "middle", height: "1.6em", margin: 0 }} width="23" height="23" data-path="public/images/flows_view_users.png" /> 查看哪些用户可以访问此工作区，或添加新用户。此选项仅对 {siteNameShort} 管理员用户可见。
* 单击省略号以获取其他选项，然后进行选择：
  * 选择 **导入工作区** 从另一个 {siteNameShort} 实例导入工作区。导航到要导入的 `.arcflow` 文件并选择 **打开**。单击 **下一步** 设置工作区导入选项，然后再次单击 **下一步** 检查冲突并完成导入。有关详细信息，请参阅[设置导入选项](/26.2/self-hosted/zh/getting-started/administration/importing-exporting-flows#setting-import-options)和[解决导入冲突](/26.2/self-hosted/zh/getting-started/administration/importing-exporting-flows#resolving-import-conflicts)。
  * 选择 **导出工作区** 以导出可导入到另一个 {siteNameShort} 实例中的工作区。设置导出首选项，然后单击 **导出** 以创建 `.arcflow` 文件。有关详细信息，请参阅[设置导出选项](/26.2/self-hosted/zh/getting-started/administration/importing-exporting-flows#setting-export-options)。
  * 单击 **设置** 打开工作区特定的[设置](#工作区设置)对话框。
* <img src="https://mintcdn.com/qiao/bVtjD3fvHFZBo1vE/public/images/flows_help.png?fit=max&auto=format&n=bVtjD3fvHFZBo1vE&q=85&s=490f5952c51d28ed61fd6c671c18184e" alt="Help icon" noZoom style={{ display: "inline-block", verticalAlign: "middle", height: "1.6em", margin: 0 }} width="29" height="27" data-path="public/images/flows_help.png" /> 单击 **帮助** 按钮可在新的浏览器选项卡中打开工作流设计器的文档。
* 使用搜索栏搜索当前工作区中的端口、[工作流 API](/26.2/self-hosted/zh/flows/flow-api)、已保存视图和[注解](/26.2/self-hosted/zh/flows/designing-a-flow#using-notes)。找到搜索内容后，单击它即可转到画布中的对象。
* <img src="https://mintcdn.com/qiao/bVtjD3fvHFZBo1vE/public/images/flows_cursor_select.png?fit=max&auto=format&n=bVtjD3fvHFZBo1vE&q=85&s=5414b9dc8e30af339196d7cb323ea2ba" alt="Cursor select toggle" noZoom style={{ display: "inline-block", verticalAlign: "middle", height: "1.6em", margin: 0 }} width="49" height="27" data-path="public/images/flows_cursor_select.png" /> 使用切换按钮设置光标执行的操作。选项包括：
  * **移动**：允许用户在画布上单击并拖动，以在画布内导航。这是默认操作。
  * **多选**：允许用户在一组端口周围绘制矩形。创建工作流 API 或需要一次移动或删除多个端口时，此功能非常有用。右键单击矩形可查看可对矩形中所有对象执行的操作。
* <img src="https://mintcdn.com/qiao/bVtjD3fvHFZBo1vE/public/images/flows_undo.png?fit=max&auto=format&n=bVtjD3fvHFZBo1vE&q=85&s=331099290c05632e25340ca096b694c6" alt="Undo icon" noZoom style={{ display: "inline-block", verticalAlign: "middle", height: "1.6em", margin: 0 }} width="28" height="27" data-path="public/images/flows_undo.png" /> 撤消最近的操作。
* <img src="https://mintcdn.com/qiao/bVtjD3fvHFZBo1vE/public/images/flows_redo.png?fit=max&auto=format&n=bVtjD3fvHFZBo1vE&q=85&s=3b58244ee41f370bbfce5ab9678c23a3" alt="Redo icon" noZoom style={{ display: "inline-block", verticalAlign: "middle", height: "1.6em", margin: 0 }} width="28" height="27" data-path="public/images/flows_redo.png" /> 在画布上恢复之前撤消的布局。
* <img src="https://mintcdn.com/qiao/bVtjD3fvHFZBo1vE/public/images/flows_save_view.png?fit=max&auto=format&n=bVtjD3fvHFZBo1vE&q=85&s=bb1c899b442dde634da7558b0e015359" alt="Save view icon" noZoom style={{ display: "inline-block", verticalAlign: "middle", height: "1.6em", margin: 0 }} width="29" height="27" data-path="public/images/flows_save_view.png" /> 保存当前工作区视图。
* <img src="https://mintcdn.com/qiao/bVtjD3fvHFZBo1vE/public/images/flows_autoformat.png?fit=max&auto=format&n=bVtjD3fvHFZBo1vE&q=85&s=cafe05ed4eb3eb7ae56d4462d4acb62b" alt="Auto-format icon" noZoom style={{ display: "inline-block", verticalAlign: "middle", height: "1.6em", margin: 0 }} width="26" height="23" data-path="public/images/flows_autoformat.png" /> 自动格式化并布局整个工作流画布。如果在工作区中选择了多个端口，请使用此功能仅自动格式化选定的端口。

<Tip>
  单击 **工作流** 面包屑链接可返回工作区列表。

  工作流画布右下角的小地图显示工作区中端口的轮廓。画布的当前视图由地图中的白色矩形表示。在画布上移动时，白色矩形也会移动，因此你始终可以大致了解自己在工作区中的位置。
</Tip>

## 工作区设置

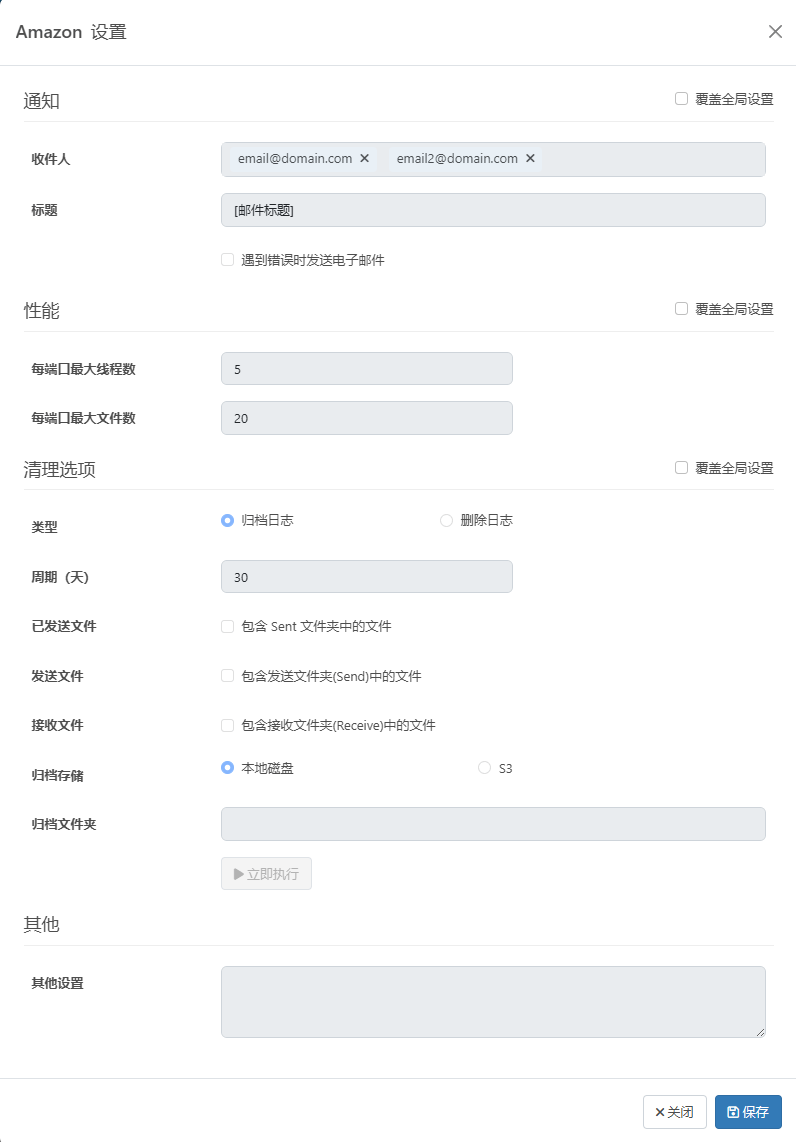
“工作区设置”对话框能够按工作区控制特定设置和方面。对于每个设置类别，必须单击 **覆盖全局设置** 复选框才能使工作区特定的设置生效。这些设置是[设置页面](/26.2/self-hosted/zh/getting-started/administration/settings/settings-page)上选项的子集。可以配置：

* [提醒](/26.2/self-hosted/zh/getting-started/administration/settings/alerts)
* [性能设置](/26.2/self-hosted/zh/getting-started/administration/settings/performance-settings)
* [清理设置](/26.2/self-hosted/zh/getting-started/administration/settings/cleanup-settings)
* 其他设置：使你能够在以分号分隔的列表中配置隐藏的端口设置（例如，`setting1=value1;setting2=value2`）。正常的端口用例和功能不应要求使用这些设置。

  <img src="https://mintcdn.com/qiao/ilnLy7gsSdFqbKmI/public/images/workspace_settings.png?fit=max&auto=format&n=ilnLy7gsSdFqbKmI&q=85&s=b6c5c64bbb56defa5b3e49dc3abe33d4" alt="Workspace settings dialog" width="600" data-path="public/images/workspace_settings.png" />